

Flushing your home's water heater twice a year prevents sediment and mineral buildup that can affect its performance. Performing this maintenance on your water heater not only improves its efficiency but also helps extend its lifespan. In this article, we will provide you with a step-by-step guide to successfully flush your water heater.
While you can have a professional HVAC contractor come out to service your water heater, it's possible for you to take on the job yourself. Here are eight steps to flushing your water heater for all the DIY-ers out there!
Step 1: Safety First
Before starting the flushing process, it is important to take some safety precautions. Turn off the power supply to the water heater at the circuit breaker or switch off the gas supply if it is a gas-powered heater. Give the water enough time to cool down to prevent any accidental burns. It's best to flush the water heater when the water is warm but not scalding hot. Once the power to the machine is cut, you should also turn off the cold water supply valve that feeds water to your water heater. This way, no water will fill the tank when you try to empty it.
Step 2: Gather the Necessary Tools
To perform a proper flush, gather the following tools and materials: a garden hose long enough to reach a drain or outside, a screwdriver, a pair of gloves, safety goggles, and a bucket or hose for collecting drained water.
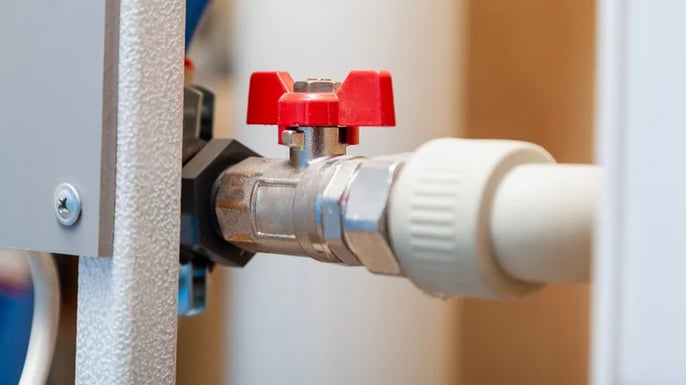
Step 3: Locate the Drain Valve
The drain valve is typically located near the bottom of the water heater. It is a small faucet-like valve with a handle or a screw. Attach the garden hose to the drain valve and make sure it is tightly secured. Do not open the drain valve yet.
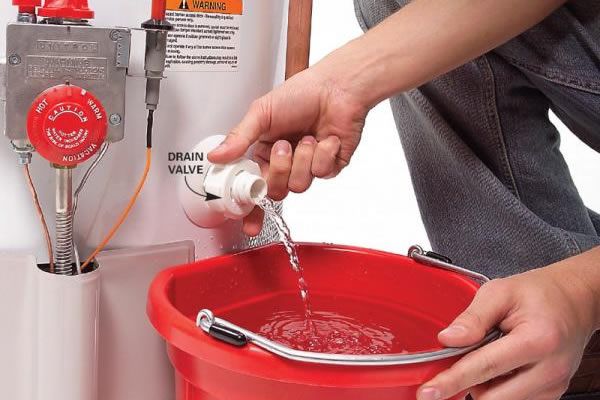
Step 4: Drain the Water Heater
Place the other end of the garden hose in a suitable draining location, such as a floor drain, a large bucket, or outside where the water can flow away from your house. Open a hot water faucet in your home to help with the draining process. Now, slowly open the drain valve on the water heater by turning the handle counterclockwise or loosening the screw. Allow the water to flow out completely.
Step 5: Flush Out Sediment
After the water has completely drained, close the drain valve. Next, turn on the cold water supply to the water heater, allowing fresh water to enter the tank. This will create a flushing action to help remove any remaining sediment or debris. Allow the water to flow for a few minutes or until it runs clear, and then turn off the cold water supply.
Step 6: Rinse and Repeat (if necessary)
If you notice significant amounts of sediment during the initial flush, it may be necessary to repeat the flushing process. Repeat steps 4 and 5 until the water runs clear.
Step 7: Refill the Tank
Once you are satisfied with the flushing results and the water runs clear, close the drain valve. Remove the garden hose from the drain valve and ensure all connections are tight. Turn on the cold water supply to the water heater and allow the tank to refill completely. DO NOT overfill it -- this can damage the appliance and cause flooding.
While refilling the water heater tank, you should also keep a few hot water faucets on to allow any trapped air to escape from the system. Once the tank is full, the water should run from the taps without any pops or hisses. It’s recommended to keep a few hot water faucets on to allow for any trapped air to escape from the system. Once the tank is full, the water should run from the taps without any pops or hisses.
Step 8: Restore Power or Gas Supply
If you turned off the power or gas supply at the beginning, now is the time to restore it. For electric water heaters, turn the circuit breaker back on. For gas water heaters, follow the manufacturer's instructions to relight the pilot light.
Flushing your water heater on a regular basis is a maintenance task that can improve its efficiency and prolong its lifespan. By following the step-by-step guide outlined above, you can ensure a successful flushing process. A properly flushed water heater increases efficiency and lifespan.

If you live in the Delaware Valley/Greater Philadelphia area and would like to find comfort within your home, visit our website or give us a call at 215 - 245 - 3200 to learn more.

